A door-dasher can turn a calm walk into a full-body adrenaline test before you have both feet on the porch. A locking carabiner on a dog leash can add a useful backup connection, but only if it is the right style, attached to the right points, and actually locked every time.
Think of it as a small piece of safety discipline, not magic hardware. It helps most at the connection point where a leash clip can twist, bump open, or fail to seat cleanly on a harness or collar ring.
In brief
- Use a locking carabiner as a backup connector between the leash hardware and the dog’s collar or harness D-ring, or as the main connector only if the leash setup is designed for that.
- Choose a sturdy locking style, not a novelty keychain clip or lightweight accessory carabiner.
- Orient it so the pull sits along the strong spine of the carabiner, not across the gate.
- Close the gate fully, lock it, and do a short tug test before stepping outside.
- Check it again after high-movement moments: car doors, trailheads, rest stops, greetings, and sudden direction changes.
First, know what problem the carabiner is solving
A locking carabiner is not there to make a weak collar safe, fix a poor harness fit, or turn a loose leash into an escape-proof system. Its job is narrower: it reduces the chance that the leash connection accidentally opens or detaches during movement.
That matters because real escapes often happen in messy seconds. A dog spins away from a skateboard, backs out of pressure, lunges at a squirrel, or shakes after rain. During those moments, a standard spring clip can get pushed at an awkward angle against a D-ring, tag ring, fence, crate door, or another piece of hardware.
The carabiner is most useful when you already have a well-fitted harness or collar and want a more secure leash connection for walks, travel stops, hiking, training class arrivals, or a nervous dog’s first few weeks in a new routine.
Pick the right kind of locking clip
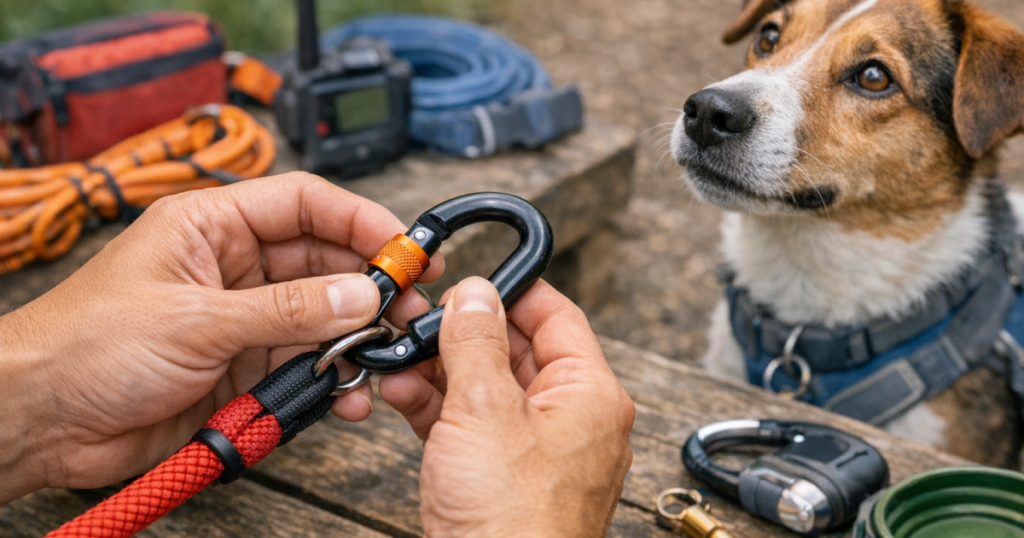
Use a carabiner made for load-bearing use or a pet-specific locking leash connector from a reputable maker. Avoid mini accessory clips, decorative carabiners, keychain clips, and anything with a thin wire gate. Those may look similar in your hand, but they are not built for a pulling dog.
The two common gate styles are screw-lock and auto-lock. A screw-lock carabiner closes manually: you clip it, then twist the sleeve shut. An auto-locking carabiner closes its sleeve by spring action, but you should still look and touch-check it. The safer choice is the one you will reliably close in the same order every walk.
Size matters, too. The gate opening needs enough room for the leash hardware and the dog’s D-ring without crowding. On the other hand, a bulky metal connector can be uncomfortable for small dogs, low-slung dogs, or dogs wearing lightweight gear. If the carabiner knocks against the dog’s chest, shoulder, or front legs, it is too large or hanging in the wrong place.
Step-by-step: attach it before the leash is under pressure
1. Start in a quiet spot
Clip up indoors, in a fenced yard, or with the dog already calmly under control. Do not try to add hardware for the first time while your dog is bouncing at the front door or halfway out of the car. The point is to build a repeatable routine.
2. Identify the real attachment points
Use the harness or collar D-ring intended for leash attachment. Do not clip to an ID tag split ring, decorative ring, zipper pull, fabric loop not meant for leash pressure, or the adjustment hardware on a harness. Those parts can bend, open, or tear under force.
For anxious pullers, narrow-headed dogs, and dogs that reverse out of gear, a secure harness is usually the better foundation. If that sounds like your dog, review escape-focused fit details in our guide to escape-resistant harnesses for skittish dogs before relying on a carabiner to solve the whole problem.
3. Clip the leash as normal, then add the backup
For a backup setup, attach the leash clip to the dog’s D-ring as you normally would. Then pass the carabiner through the same D-ring and through a fixed metal part of the leash connection, such as the solid eye or ring behind the leash snap if your leash has one. Do not clip the carabiner only around the moving spring gate of the leash snap.
If your leash does not have a usable fixed metal point near the snap, do not improvise with a flimsy tag ring or random loop. Use a leash designed with a secure attachment point, or keep the carabiner for a different setup where the hardware lines up cleanly.
4. Lock the gate completely
Close the carabiner gate, then engage the lock. With a screw-lock, twist the sleeve until it stops. With an auto-lock, let it close and then try to nudge the gate open with your thumb. If it opens, it is not locked or something is interfering with the mechanism.
5. Rotate it into the strongest position
The long solid side of the carabiner is the spine. The leash pull should run along that long axis. Avoid cross-loading, where the dog’s force pulls sideways across the gate. Also avoid trapping three or four hardware pieces in a cramped cluster, because crowding can push the gate into a weak or half-open position.
6. Do a short tug test
Before you open the door, hold the leash close to the dog, apply a firm controlled pull, and watch the hardware. The D-ring should stay centered, the carabiner should stay locked, and the leash snap should not twist into the gate. If anything shifts into a strange angle, fix it before walking.
Where it helps most in real life
A locking connector earns its keep in transition zones. Front porches, apartment lobbies, parking lots, campground check-ins, vet clinic doors, and trailhead parking areas all combine excitement with poor margins for error. These are the places where a dog may surge forward, freeze, spin backward, or wrap the leash around your legs.
It can also be useful on road trips, where routines change and dogs are handled by tired humans at gas stations, hotel side doors, and unfamiliar backyards. If you keep spare safety gear in the car, a properly sized locking carabiner can sit alongside paper ID copies, a slip lead, recent photos, and other basics covered in a lost-dog emergency kit for road trips.
For long-line training, a locking carabiner can make sense if the line and harness are compatible, but avoid heavy hardware that swings into the dog or hits the ground during recalls. The longer the line, the more force and speed can build before the leash tightens, so clean alignment matters even more.
When not to use one
- Do not attach it to a slip lead, prong collar, or training collar in a way that changes how the tool releases or tightens. Extra hardware can interfere with the intended action.
- Do not use it as a car restraint by itself. Vehicle restraint is a separate safety problem and should be handled with gear designed for that purpose.
- Do not rely on it for unattended tethering. Dogs can chew, tangle, panic, or pull at unsafe angles when tied out without supervision.
- Do not clip it to a retractable leash cord. Thin cords, sudden stops, and bulky connectors are a poor combination.
- Do not keep using a sticky, rusty, bent, or gritty carabiner. If the gate does not close smoothly every time, retire it from leash duty.
Build it into a pre-walk safety check
The best leash setup is the one you can verify in seconds. Before each walk, run the same sequence: collar or harness fit, leash clip seated, carabiner locked, tags present, door control ready. For most dogs, that takes less time than finding your keys.
For escape-prone dogs, pair hardware checks with backup identification. A GPS tracker can help with wider-area location when network and battery conditions cooperate, while a visible ID tag or Bluetooth-style backup can help close to home. If you are weighing a simple neighborhood backup, our Pawscout Smart Pet Tag review explains the difference between close-range ID support and true GPS tracking.
Common questions
Can I use a climbing carabiner for my dog’s leash?
A sturdy locking climbing-style carabiner is often better than a novelty clip, but it still has to fit the leash and harness correctly. The main concerns are gate closure, size, weight, and whether the pull stays along the spine instead of across the gate.
Should the carabiner replace the leash clip?
Sometimes, but only when the leash design allows a clean, secure connection. For many everyday leashes, the more practical use is as a backup alongside the existing snap. If replacing the clip creates a bulky or awkward chain of hardware, do not force it.
Is a locking carabiner enough for a dog that slips harnesses?
No. It secures the leash connection; it does not fix escape behavior or poor gear fit. A dog that backs out of harnesses needs better fit, careful handling at thresholds, and usually a backup plan such as a second connection point or escape-resistant harness.
What to remember
A locking carabiner is a small, useful layer in a broader lost-dog prevention routine. Use it with solid leash hardware, orient it correctly, lock it every time, and check it before the leash comes under pressure. The win is not fancy gear; it is one fewer avoidable failure point when your dog gets startled, excited, or suddenly decides the squirrel is the main character.